Saturday, June 18, 2011

Latest Project.


Oh, I forgot to mention that project I'd been working on for the past 9 months is finally finished.


Please meet Amelia Elaine.


Born June 11, weighing 8 lbs 10 oz.


One of the best thing I ever made!!!

Saturday, March 26, 2011

Vintage Baby

I was going through my pattern collection looking for baby stuff and I came across this little gem.   

baby
Methinks this was my Gramma’s, it’s got a copyright of 1970 and most of the pieces were cut out,  indicating they’ve been used before.  I love the thought of my Gramma lovingly making her babies clothes.  And the fact that I get to use the very same pattern to make my baby something is just heartwarming to me.

I have found that little baby dressed require such a small amount of fabric!  I went through all my scraps from over the years and,  much to my excitement, found a whole bunch of possibilities.  So many, in fact, that I ran out of patterns.

So I made two of the same dress out of different fabrics.  

And I’m so so glad I did because the look completely different!


The first one was made with scraps from a maternity dress I made with my first baby.

Please disregard the large amounts of baby going on here.  I was 8 months pregnant.

Also please disregard the large amounts of weird faces I’m making. 


**Note to self:  Start looking normal for pictures.


 556W2878556W2664

So the moral of the story here is the dress is made out of a beautiful linen.  And I had JUST enough to make this: 
Front Back
baby1  
The pictures don’t do it justice in my opinion.  You should see it in real life.


And know what else?  I think I see a pair of ruffle butt panties in it’s future…


The other one was made from the scraps of another dress I made myself back in 2007 for a friend’s wedding.  I don’t have any pictures of me in said dress, which is a shame because I think it’s darling.  But here’s the fabricDSC_8378 

And,  again,  I had barely enough to make Baby Girl this: 

DSC_8376 DSC_8377
It’s probably my favorite.  It’s just so yummy!  I can’t even handle it! 

And so the moral of the story here is always save your scraps because look how much cuteness can come out of it!!

Thursday, March 24, 2011

Ruffle Butt

I found a pattern for diaper covers over at Made and decided that I must own a few pairs.  Especially after making the yummy dress I made yesterday.
Dana's got a free pattern and tutorial which is awesome.
I basically followed her instructions to the letter and ended up with this


Um hi.  Can you say adorable?!  
I did, however, add something very, very important.


Ruffle butt.

Yes, I know.
Every little girl needs to have some ruffle bottomed pants.
Or, in this case, panties.

Here's what I did:
I cut a whole bunch of strips that were 1 1/2" wide out of scraps.  Some were long, some were short.  I figured it didn't really matter since they would be all bunched up.


Then I cut out the pattern, found here.
I took the back and measured across the fullest part, about 1 inch down from the top.
And then made a long strip that would go about 3 times across it.


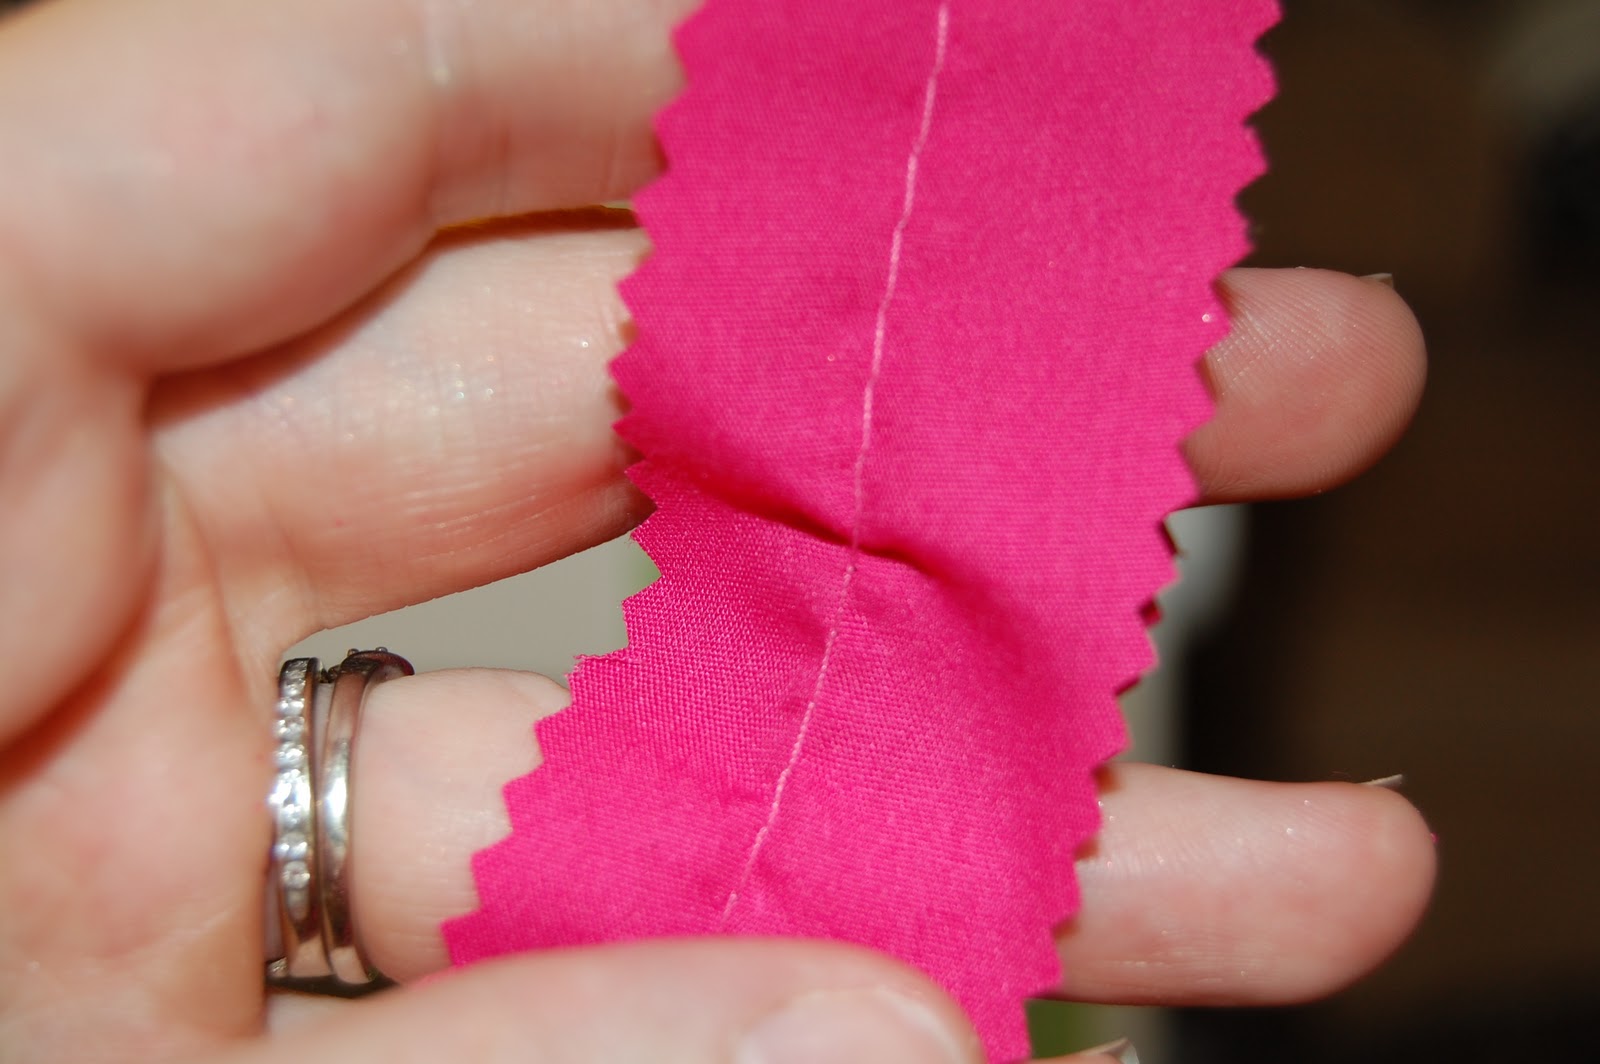
Then I pressed the seams down and trimmed them with my pinking shears.


I then decided to just use the pinking shears all the way down the length of the strip.
The better and probably more attractive way of doing this would be to use a serger and edge finish the strips.
My serger and I are not on speaking terms at the moment.
Hence the pinking.


I just barely did it along the edge as not to lose a lot of width.


And it made a pretty mess for me to clean up.  
But it's pink so it's not all bad, right?!


I then ran a gathering stitch down the middle of the strip.


And then gathered the crap out of it!


I didn't worry about finishing the edges because they would be encased in the seams.
But I imagine it would be a good thing to do if you were to be adding ruffles to pants or pre-made panties.
Anway I then laid the ruffle across the back of the diaper cover and pinned in place.


I used a tiny stitch to make sure it was good and secure.


And repeat.
4 times.


And then I followed Dana's instructions from there.
I did, however, use bias tape when making the elastic casing around the leg, just to make sure the ruffles didn't get in the way of sliding the elastic through.

And there you have it.
Adorable little girly underthings!

I don't have a model yet, so this will have to do.


Oh alright.  Just for fun...


I have no words.  I am just so dang excited to have this baby girl!!

Wednesday, March 23, 2011

Itty Bitty Baby Dress

I have a problem.  It’s a big one too.
I have been surrounded by nothin’ but boys all my life.
3 brothers, then a husband, then 2 sons.
So you could say I’ve pretty much got a handle on the whole male situation.
Well, now that Little Miss is on the way, well, a crapload of opportunity has opened up for me.
No seriously.
Headbands, bows, flower clips, dresses, pink stuff.
And it’s everywhere!
And I can not control myself!!
It’s all so adorable and yummy!
So prepare yourselves, friends, for a rapid-fire of girly goodness coming right at ya!
It all started with the quilt.
Remember??
And now I’ve made a dress.
Not only a dress, but a tiny dress.
Teeny tiny adorable dress.
Have you ever been to Made By Rae?
Go there.
Now.
She has a FREE pattern for said itty bitty dress.
And also a ton of pictures and cuteness.
And it was so easy!
I made it in less than an hour, start to finish.
Ridiculous.
Okay enough talk.
Wanna see it??!?!?
DSC_8302
**SQQQEEEAAAAALLLLLLLLLLL!**
No really, it’s pretty stinkin’ cute.
The pattern calls for 1/2 yd of fabric, but I had 1/4 yd of this adorable Hello Kitty stuff that I bought recently just because I couldn’t resist the cuteness.
DSC_8305
(See, I told you I have a problem!)
So I used a pink I had for the lining and made it a little shorter than the pattern.
Which is alright because my next project is gonna be an adorable pair of ruffle bottomed bloomers to go underneath.


DSC_8314
 DSC_8315  
DSC_8316
Just try and resist snuggling a little baby in this dress!!

THANKS SO MUCH TO RAE FOR THE AMAZING PATTERN!!!  YOU ROCK!!!
(Also pretty sweet name, don’t you think? )

Sunday, February 20, 2011

Baby Quilt

I saw this quite a while ago and fell in love with it!  And I put it in my "bank" of things I wanna make someday...
{source}
And then we found out I'm having a girl and a whole world of opportunity opened up for me!
And the first thing I had to make was this quilt.
I couldn't get it out of my head.
So I went fabric shopping and came up with this:


I basically followed her tutorial fairly closely.
I obviously used different fabric.
I cut the letters out using my Silhouette, which was AMAZING!  Saved me so much time!  I really heart that little machine.
And changed the word "play" to "poop" because, come on!  We all know that's whats REALLY going on.
And I used black thread to zig zag stitch around the words.  I love how they kinds of pop.
I simply quilted diagonal lines across the thing, since I didn't really want to hand quilt anything and don't own a super fantastic quilting machine.
I basically love everything about this little quilt and can't wait to let my little belly snuggle with it...or on it...or whatever.

So a HUGE thanks to Vanessa from V and Co for this amazing idea and tutorial.
And expect a lot more of where this came from!
I'm not due until June!
And there's a WHOLE lotta ideas out there for little girls...
I CAN"T WAIT!!!


Wednesday, February 16, 2011

Candy Bottles


I was up home at my parent's house and Valentine's Day was fast approaching.  I saw this post and thought it was an awesome idea to make for them.

I had no supplies so I had to go shopping at the limited stores over there, but I think I made it work.

So here's the before:


And here's the final product: 

It was really fun trying to make this and make it work with what I had.

I spray painted the case, inside and out.  Then I decorated the CRAP out of it!  
I cut labels for each bottle out of black paper and then used ribbon and felt to decorate them.

I chose three snacks for my mom, and three for my dad, as so indicated by the black and pink ribbons.
I tried to think of cute little sayings to go with each snack.


All in all it was a super fun idea! And a blast to make.
The only downside was trying to drink all the soda that came in the bottles...


 A perfect idea for someone who's hard to buy for.  And it doesn't just have to be for Valentine's Day! This would work for a birthday, maybe even Father's Day!  The possibilities are endless!!

So thanks again to Becca over at Nap Time Journal for the super fantastic idea!  If you haven't been to her blog, stop what you're doing right now and go!  She's awesome.

Monday, February 7, 2011

Valentine’s Day Wreath

I was browsing through one of my favorite blogs and saw this little beauty. 


And I decided it might be a fun little project.
Plus my door has been looking a little naked since I took down my autumn wreath.
I know, I need a Christmas wreath.
All in good time.
ANYWAY, so I went to the dollar store and found a floral form.
 DSC_3344
And went to Wal-mart and bought some $1 Valentine’s Day ribbon.  And I wrapped it around the form and hot glued the ends down.
 DSC_3346
Then I took some cupcake liners and went crazy!
FYI: IMPOSSIBLE to find cute cupcake liners in a small town.  I made due with what I could get my hands on.
DSC_3364
I followed her directions pretty closely and worked in sections.  Instead of bunching them up, though, I sort of wrapped the liners around a chopstick (See that green stick in the background?) and then pressed it into a dab of hot glue.  I found it a lot less brutal on my poor burnt fingers.  Plus I could press the liner slightly into the form, which kind of gave it a more secure feel.DSC_3403
And I just worked my way around.  I also put them on the outside of the form, which makes it nice and puffy.
Then I sprayed some adhesive on the liners and poured a whole bunch of red glitter all over the thing.  It was magical.
I then made a sort of flower out of a couple liners and glued it on.  Then I tied a bow out of some thin ribbon and glued it in the center of the flower.
I glued some ribbon across the back and tied it in a bow and hung it on the door.
 DSC_3404
I think it turned out super cute, even though I wasn’t a huge fan of the liners I got.  Fun colors and a fast little project.
DSC_3406
A huge thanks to Jen over at Tatertots and Jello for this super fun project!  She’s pretty awesome, just so ya know.