Friday, February 19, 2010

Easy Nursing Apron

I own a nursing apron and it does a good job, except it’s small.  My baby has no problem pulling it over and exposing all our bidnaz.

My dear friend recently had a baby girl and I thought she could use one. 

I used the one I have as a basic pattern, only I made it a little longer and a lot wider.

It’s a very simple design. 

Cut a piece of fabric the size you want the apron to be.  Hem three of the sides.

Cut a small piece of fabric, about 2 1/2”x6 1/2”.  Make a strap by sewing it right sides together and turning it right-side out.

Then fold it in half and sew two D-rings inside, like shown below.

Then make another strap, same width, but as long as you want it.  Make it more of an elongated triangle, so one end is considerably smaller than the other.

Sew right sides together and turn.

Press the final side, about a half inch, cut a small piece of boning, place it in the middle of the edge.  Sew the hem, enclosing the boning.  Then sew on your two other straps on either side of the boning.

DSC_2727

DSC_2726

It turned out so cute I may just make one for myself!

Baby Learning Books

I saw an adorable idea over at Lu Bird Baby and decided to make a couple for my favorite babies.

I used her ideas for pictures and took pictures around our house of familiar things.  It was a lot of fun trying to find things to photograph. I then added numbers to the photos in Picasa.

DSC_2744

I found some adorable paper at Roberts and made cute covers and title pages.

DSC_2745

I bought a $1.00 photo album at Wal-mart, but it had quite a few more pages than her example. 

SOOO…

I improvised.

DSC_2746DSC_2747DSC_2748DSC_2749 

Izacc and I scrambled around the house looking for items of the ten basic crayon colors.  It was kind of a fun game for us to play and see how many things in each color we could find.  I also had enough pages to add some familiar faces of Mom and Dad, Gramma and Papa, Aunts, Uncles, and Cousins, as well as the babies themselves.

(Its a good thing these kids are cousins, it made their books very similar and the personalized changes very simple)

DSC_2755

Izacc helped so much that I figured we’d better make one for him as well.  He’s so super smart and a little above learning his numbers.  SO…

DSC_2758 

Let’s learn what the letter look like!

DSC_2759

It was really a challenge to find something for every letter, but we got it done.

DSC_2760 

DSC_2761 DSC_2762

It was a fun and inexpensive project that the kids love.

If you’d like to make one for yourself, please feel free to use my pictures here.

There are obviously some you’ll want to personalize for yourself, unless, you know, you want a picture of my son and our dog.  It’s really easy to take a picture and edit it in Picasa.

Have fun!

Friday, February 12, 2010

Prelude to a Valentine's Day

In addition to the Christmas catch up posts that are on the way, here's a little sneak peek at the Valentine's Day goodies I've been working on.

All shall be revealed soon...

Thanks for sticking with me...

Monday, February 1, 2010

Baby Blankets

I saw the aptly named "Stay 'N Play" blanket here and decided I knew a few deserving candidates.

So I made four.


They come together fairly easily and as long as you don't have any, erm,
distractions, can be put together in a few hours!

I bought a couple different patterns of fabric and squared them to 37''.
Then I sewed four 2'' lengths of ribbon about 2''-5'' from the corners on the "top" fabric, and 1 ribbon length dead center on the "bottom"fabric.
I then placed the bottom fabric face down, then placed a layer of polar fleece, then added the top layer face up.
I pinned the layers and made my markings with a quilting pencil.

On this one, I stitched vertical lines 1 1/2'' apart. It took longer than I was prepared for, but looked so cute and puffy.


This one I stitched the lines 2" apart and it went a bit faster and looked just as puffy and cute.
On these, I did diagonal lines 2" apart. I really liked the way the diagonals looked and it was really fast sewing. If you're in a hurry, I would totally suggest doing diagonals.
I can't decide which way I like better. I'm thinking I want to make another one and do diagonals in both directions, making a diamond sort of pattern!


Then, after they were all sewn together, I trimmed the edges to make them even and sewed on a satin baby boarder.
That was it! Done!

I folded them up and then added a new linky toy.


I think my babe needs one, although, he is almost to the point where I would need to tether HIM down, not the toy! :)

Thanks again to

Sunday, January 31, 2010

My bad!

Hey! I have a wonderful idea!
I'm going to get my butt in gear!
Sound good to you?
I have a whole lotta crafty love coming your way from the past few months!
I've been slacking on the posting, it's true!
But I will play catch-up and give you a little taste of whats been going on around here!
So look forward to that!
(I know you're on the edge of you seat.)

Thanks. Love you. Bye.

Sunday, January 10, 2010

Christmas Gift Card Holders

This is the post I was featured with over at Craftoholics Anonymous back in December.


Hey everyone, my name is Camie. I'm an out-of-work actress with a degree in cosmetology, but I moonlight as a stay-at-home Momma. I've got two of the cutest boys in the world making my life super full, but I sometimes find a little time to play around with crafty things. I've recently started a blog called Cee Cee's Dreams where I keep all my fun stuff. Feel free to check it out sometime!

Here are my handmade Christmas Girt Card holders.
These are super cute and fairly easy to make. They come together pretty fast, assuming you aren't making 25 of them...

Start off with a 12"x12" piece of double sided card stock. It can be the same color on both sides or two different designs, as pictured below.
Measure to the exact middle on each side, which should be 6", and mark lightly with a pencil.

Fold in half, meeting both edges in the middle, at the marks.
Fold it again the other way, creating a scored box in the middle.
Get a sturdy bowl the size of the folded paper, about 6". I say sturdy because I tried using an old plastic bowl and my circles, unbeknown to me, were not, how you say, congruent. So this nice, thick, strong Pyrex did the trick quite nicely. Trace the bowl from one fold to the other. You're going to want to open it up, fold it the other way, and do it again so all four edges outside the middle square have half circles on them.

When all the tracing is done, open it up and cut it out, following your markings.It should look like this when you're done.
Then get the paper you want for the backing of the card and cut it to fit the middle square. Mine were just shy of 6"x6". You want to make sure that you can fold the flaps down easily, so if it catches, trim it a little.

Once you have it the right size, use some adhesive and stick it down!

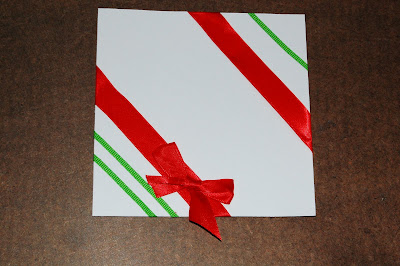
Then cut a smaller box out of another piece of card stock. I've used white, I think it is a nice canvas to play on. Next you want to get creative and add ribbon. You can use any thickness or feel you like, let you creative juices flow! Measure the lengths you want and I like to add a bow.
Use a credit card or key card for the placement or the ribbon. I tape the ribbon on the back, and then add a little adhesive to either side on the front, but be sure to leave enough ribbon free so you can slide the card in and out.
Add all the other ribbon in whatever design you like. It's really a lot of fun to play and see what looks good.
Use hot glue to adhere the bow onto the ribbon.
Then you'll want to adhere the card stock onto the card.
If you like, you can add a personal note using the scraps from cutting the edges. I usually do squares, but thought I'd change it up a bit.
Place the gift card and personal message into the card.
You'll then want to fold it, one flap at a time, tucking the final flap under the previous one.

Then press it with an iron, be careful not to burn it!!

Flat as a pancake!Add a festive sticker on the back to seal it and you're done! They can be mailed like this and since they are an irregular size, will be hand canceled, so you don't have to worry about losing your contents in a machine somewhere! They do cost a bit extra to mail due to their size, but who cares! They're cute as could be!
Or you can put a bow on it and place it under the tree.
Or hand deliver it at the office or, you know, where ever.

I really like this card because it can also double as a birthday card, invitation, or announcement.

Thanks for checking it out! Happy creating and Happy Holidays!

Saturday, December 19, 2009

Pictures for Baby Learning Books

Please feel free to use these pictures!  Or bounce off them and use them for ideas.  Obviously some of them are very personalized, but you get the idea.  Have fun! 

Sunday, December 13, 2009

Advent Calendar

So I made an advent calendar this year. I finished it just in time for the first day, and am just now getting around to posting about it. It was super easy and took me two days to make, start to finish. (And that's saying a lot with my two kids!)


I got the idea here.
Here's what I used:
8 sheets of white felt
red floss
28 red buttons
1/4 yard plaid material
clothesline
ribbon
1 big bag Ghirardelli Peppermint Bark

  • I cut 25 strips of felt that were 6 1/2"x2 1/2", then rounded the edges.
  • I sewed the buttons on about and inch er so from one of the ends. (The basic instructions are here.)
  • Then I folded up the end with a button to make a pocket, and used a slip stitch to go around the edges, like here.
  • I then sewed a 4" length of floss to the top of the envelope and knotted it both on the bottom and the top, just to make sure it didn't pull through.
  • I printed the numbers 1-25 off in one of my favorite cutesy fonts and traced them onto each envelope using one of those disappearing ink fabric pens. Then I just stitched them right on!
  • I filled each one with a yummy piece of peppermint bark, which are the perfect size for these pockets! Then folded the flap over a clothesline and wound the string around the button to close it. I tied pieces of material by each one and ta-da! All done! I tied a bow on ether end and hung it in the hall.


To make the stars, I printed the pattern off from here. Then I covered it with tape (just so it didn't get ruined by tracing) and traced it onto felt 6 times. Then I sewed a button into the middle of 3 stars. Then slip stitched two stars together, and right before getting all the way around, I stuffed them. I sewed them onto lengths of ribbon and tied bows of fabric to place on top. I like how they turned out! Super cute!
Oh! And to keep track of where we are, I printed these off, cut them out, attached them to some floss and tied them to each button. I placed them inside the envelopes with the chocolates and then every day when we take the chocolate out, we pull the dangle out too. Here we are today, 13 pockets in.So a big thank you goes out to Jenny B Harris over at Allsorts for the super cute idea! I love it! And so does my little man, who has been loving having a piece of yummy "special" chocolate every day!

Saturday, December 12, 2009

Yipee

I have some exciting news.
I'm going to be featured over on a little blog called
Craftaholics Anonymous
A super cute blog, you should definitely go see her stuff. ADORABLE!
I'll be on December 15.
It's Readers Tutorial Week.
Check me out, would ya?
Good times.
Also, she is having super awesome giveaways December 14-18.
Really, go there.
Really.
Merry Christmas.